5 simple ways to make DIY flower Bouquets
Follow the below steps for making beautiful bouquet yourself
Find the Florist In you.
Flowers have always been a great way of expressing emotions and adding beauty to any occasion. In Qatar, flower arranging is considered a cherished art form deeply rooted in the culture. Creating your DIY bouquet is a fun and budget-friendly way to celebrate a special occasion, decorate your home, or express your creativity. For occasions like Mother’s Day, Valentine’s Day, or a wedding, making, and gifting a unique DIY bouquet is a great way to add a personal touch to your floral arrangements.
While the best floral arrangements look effortless, creating a beautiful DIY bouquet requires some planning. You can add some easy add-ons from the flower craft collections or get them from the flower shops in Qatar. The ideas are just a few options, so use your imagination for more personalization. It is worth considering that the decorations you include in your bouquet may only last for a while, as the recipient may choose to remove them to place the bouquet in a vase. However, these charming flower bunches can be assembled in just a few minutes, and the unique and personalized touch will surely convey to your recipient how much you value their happiness.
This blog post will explore five simple ways to make DIY flower bouquets in Qatar. So, unleash your creativity and impress your loved ones with a handcrafted floral arrangement.
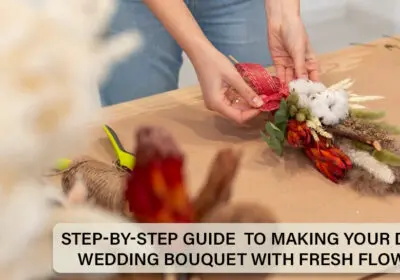
How to Make a DIY Bouquet: Step-by-Step Guide?
Step 1: Gather the flower craft Materials.

To begin the process of making flower bouquets, it is important to gather all the required materials for the craft. These materials may include:
- Beautiful flowers (You can either cut from your own garden or buy from the flower shop)
- Scissors or floral snips for cutting.
- Floral tapes and rubber bands
- Ribbons, vases, and other add-ons of your preference (such as napkin rings, tulles, wires, beads, plastic bead strings, etc.)
By having all the necessary items ready, you can create a stunning bouquet that will be perfect for any occasion.
Step 2: Choose the Right Flowers for Floral Craft

When creating a DIY flower bouquet, choosing the right flowers that match the occasion and theme is important. Consider the color scheme and pick flowers that complement each other. Monochromatic schemes can be stunning, as they showcase different hues of the same color. Mix and match flowers of varying growth patterns, shapes, and sizes to create an exciting combination. It’s recommended to choose seasonal blooms, which are usually cheaper and fresher than off-season ones. The choice of flowers depends on personal preference, but daisies, succulents, and chrysanthemums are great options. It’s also a good idea to order more flowers than you need just in case you make mistakes. Lastly, schedule flower delivery well in advance to avoid last-minute stress.
Step 3: Cut and Prepare Flowers for Bouquet-Making

Before arranging your flowers, prepare them and take some necessary steps to make them last longer. Firstly, set up your worktable and remove any packages or rubber bands around the flowers. Although you may be tempted to start arranging them immediately, following these steps is crucial for optimal results.

- Clean the Stems:

- Remove any extra leaves or damaged petals that might obstruct water flow or detract from the overall arrangement. You can use your hands or shears to gently remove unwanted foliage, focusing on the lower half of each stem.
- Remember to trim any unwanted buds competing with the central flower.
- Carefully remove the thorns from thorny roses, if any.
- Fresh Cuts & Keep it Hydrated:

Once the stems are clean, make a fresh, diagonal cut using sharp shears at the bottom of each stem, as it increases the surface area for water absorption. Now, place the trimmed stems in a clean vase or bucket filled with cool water and flower food (if using). This temporary holding vessel allows the flowers to rehydrate after transport.
Step 4: It’s Time for Flower Arrangement

It’s time to decide how you want to arrange your flowers for the bouquet. One approach is to begin with a focal flower and gradually build around it. Choose your most interesting or favorite two or four flowers to be the focal point of your bouquet. Then, hold it upright and add your supporting flowers and greenery to balance the design. Additionally, it is advisable to leave four to five inches of exposed stems at the bottom to place them in water before use, which will help maintain their freshness.
Step 5: Secure Your DIY Bouquet

Now that you have arranged your flowers, it’s time to make sure they last as long as possible. You can add delicate fillers like baby’s breath or myrtle wax flowers for extra volume. You can wrap floral tape tightly just below the blooms or use floral wire to firmly bind the stems at the flowers’ base. In either case, you can use floral tape to conceal any wire and emphasize the flowers’ natural beauty. Finally, trim any excess stems and place your creation in a vase filled with fresh water for a clean finish. Your beautiful DIY bouquet is now ready to brighten someone’s day!
Personalize DIY Florals in Qatar

As you’re putting the final touches on your DIY bouquet, consider adding a decorative ribbon around the stems just below the floral tape. There are many options to choose from, such as tulle for a romantic feel or a bolder ribbon for a more modern look. Additionally, you can use napkin rings to add a surprising and delightful touch. To achieve a fuller effect, be sure to wrap the ribbon around the stems multiple times while keeping it parallel to the floral tape. If you’re creating a DIY wedding bouquet, leave enough space at the bottom so the bride can comfortably hold it.
Florist Techniques on Making 5 DIY Bouquets Easier
The Classic Hand-Tied Bouquet: Begin by selecting a striking focal flower to place in the center of your bouquet. Then, add an assortment of flower types and textures to create visual interest. To protect the delicate flowers, place the hardier stems around them. Wrap twine securely around the stems, just below the bloom heads, and tie a double knot to ensure stability. Trim the stems gradually until they fit comfortably in your chosen vase. -Your DIY Hand-Tied Bouquet is ready to impress.

The Bunched Bouquet Beauty: if you need a clean and modern aesthetic bouquet, try bunch bouquets. When choosing flowers for bouquets, choosing similar stem lengths is important. Once selected, cut the stems to a uniform length, making sure they will sit comfortably outside your chosen vase. Then, divide your flowers into small bunches and use twine or ribbon to bind the stems at the base of each bunch tightly. Finally, place the individual bunches together in your vase, creating a full and cohesive bouquet.

Hoop Wreath Magic: When it comes to creating a hoop wreath, you have the freedom to experiment with the placement of your DIY focal flower. Consider slightly off cantering the flower to create asymmetry for a unique, eye-catching look. To balance out the composition, you can add smaller blooms to the opposite side of the hoop. To ensure your floral arrangement stays securely in place, wrapping floral tape around a section of the hoop is recommended. When it comes to attaching the flowers, you can either add individual flower stems to the hoop using floral wire or create small clusters by attaching two flower stems together with floral wire.

The pomander bouquet, which is also known as the flower ball, is an excellent and charming choice for decoration. It can be used in a variety of ways, such as for chair decor, hanging balls, or bouquets. The making process is quite simple and requires only one type of flower(roses/gypsophila). Begin by selecting small and compact DIY blooms. Attach a ribbon or string to a sturdy foam ball, and then insert the flowers into the foam, completely covering it. You can choose to hang the pomander bouquet or carry it using the ribbon handle.

Nosegay Bouquets: The nosegay bouquet is a small, charming arrangement consisting of a few focal flowers surrounded by filler flowers and foliage, tied together tightly with floral tape and finished with a decorative ribbon.

Tips for Maintaining DIY Flower Bouquets:
- When buying flowers for an event, it’s best to purchase them a week in advance if they are in a tight bud, like freesia or lilies. This will give them enough time to open up and look their best.
- Set up a mirror in front of your workspace to better understand how your bouquet will look to others.
- When adding items to the bouquet, place them in the same direction to create a spiral effect. Also, ensure that the decorative ribbon is parallel to the floral tape.
- For a balanced arrangement, combine larger focal flowers with smaller secondary flowers. Use greenery sparingly to enhance the bouquet’s overall look, providing a backdrop to showcase the flowers and add a touch of freshness.
- To prolong the blooms’ lifespan, change the water regularly, add plant food, and trim the stems every few days. Keeping the bouquet away from direct sunlight can also help prevent wilting.
Wrapping it up
The steps, techniques, and tips to make DIY Flower arrangements outlined above – hand-tied, pomander, hoop wreaths, and nosegay – offer a range of options to suit various themes and preferences. Whether it’s for a special event or to simply brighten up your home, DIY floral arrangements in Qatar are an excellent way to express your creativity and passion for flowers. So, why not give it a try and discover the joy of creating your own unique bouquets?
FAQS on simple ways to make DIY flower Bouquets.
What flowers are best for DIY bouquets?
A: When it comes to selecting flowers, it’s important to choose a mix that offers a variety of stem lengths, textures, and bloom sizes. Consider local and seasonal options for freshness and affordability. Popular choices include roses (classic and romantic), lilies (elegant and fragrant), hydrangeas (lush and full), carnations (affordable and long-lasting), and baby’s breath (delicate and airy).
How can I extend the life of a DIY bouquet last?
A: Here are some tips to extend the life of your blooms: Cut stems diagonally, remove leaves below the water line, use a clean vase with fresh water and keep in a cool location away from sunlight.
Are there any unique DIY bouquet ideas?
A: Using alternative containers like mason jars, mugs, or baskets is a unique idea. Create a statement piece with a hoop wreath or a rustic arrangement using upcycled materials.
Where can I find more inspiration for DIY bouquets?
A: online tutorials and social media platforms like Pinterest and Instagram can help you find a variety of photos and explanations on DIY flower arrangements. You can also explore flower shops in Qatar and markets for unique blooms and speak to florists for tips.
Follow Our Social Media page for regular updates on flower arrangements and offers.
Get 15% off using “NEW15” coupon code on first purchase flowers and gifts at Black Tulip Flowers, Qatar