Step-by-step guide to Making Your Dream Wedding Bouquet with Fresh Flowers
A wedding bouquet is nothing but a statement piece that genuinely reflects your personality and style. As you gracefully walk down the aisle, all eyes will be on this carefully arranged collection of fresh blooms. But what if you’re on a budget? Why not make your wedding bouquet that has your flair of personality? Worried about how to make a wedding bouquet of your own? Fear not! Whether you’re a seasoned crafter or a novice, creating your own fresh flower DIY wedding bouquet is easy with our step-by-step guide on how to make it.
The Benefits of a DIY Wedding Bouquet
Bridal bouquets are an essential part of every wedding. It is probably the most crucial accessory and styling detail for every bride and the bridesmaids. That’s why it’s one of the elements that people pay significant attention to. Choosing a floral designer to create a beautiful bouquet is a great option. Professionally made bouquets are costly mainly due to the labour involved. Sourcing fresh blooms adds to the cost, but the overall price goes up based on the time and complexity of the design. Creating your wedding bouquet is a budget-friendly option and an opportunity to incorporate your style and personality into your special day. Although it may seem harsh, it’s an exciting and fun thing to do – a challenge worth taking. In addition, the personal effort you put into it will add a sweet and unique touch to your wedding.
Before you start, you should know
• Create a list of all the places you want flowers. • Understand the cost of buying cut flowers. • Know the sources available for buying DIY wedding flowers. • Choose the right flowers • Understand the workload of designing DIY flowers and make a week-of plan. • Learn how much do-it-yourself flowers will cost.
How to make a DIY wedding Flower Bouquet?
1. Choose the elements of your bouquet.
When planning your wedding bouquet, consider the color palette carefully. Traditionally, bouquets feature white and cream flowers, but you can choose any color you like. You can get inspiration from various sources, including the overall floral design, your wedding style, the emotions you want to convey, the time of day, the venue, and your wedding dress. Opt for sentimental, contrasting, or matching colors, soft or vibrant tones, and light or darker shades if you like to. Whether you choose a single color or a small range of colors, ensure it aligns with your preferences.
2. Gather all your supplies
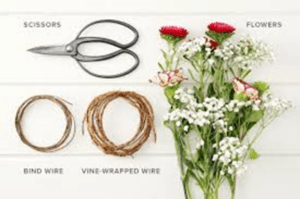
To make your beautiful wedding bouquet, you’ll need: • Fresh flowers of your choice • Flower tape • Flower shears • Ribbon • Pearl tipped pins
3. Choose the right flowers
What flowers?
When creating a stunning wedding bouquet, consider incorporating 1-3 types of vibrant primary flowers with long stems, like roses, orchids, or hydrangeas. Don’t forget to consider the season and also choose secondary flowers, such as spray roses or freesias, in addition to filler flowers and greenery for that extra touch of elegance.
When to buy?
Buying flowers a couple of days before the wedding is enough. However, flowers like freesia or lilies, cut in tight buds, should be purchased up to a week early as they require more time to open and look their best for the big day.
4. Prepare your fresh flowers
To prepare your flowers for arranging, start by cutting the stems at a diagonal angle using sharp shears or a knife, helping the flowers . This will help the flowers absorb water more effectively. Aim for a stem length that feels comfortable to hold in your bouquet. Inspect the flowers and remove any wilted leaves or damaged petals.
If you have time, consider pre-conditioning your flowers by placing the stems in a bucket of cool water with a floral solution for a few hours before assembling the bouquet. This can help the flowers stay hydrated and last longer. If you want to add a touch of green to your bouquet, you can leave some top leaves on the flowers. Then, trim all the stems to an even length, but leave them long enough to work with efficiently (around 10 inches). If you prefer a shorter stem length, you can trim them later.
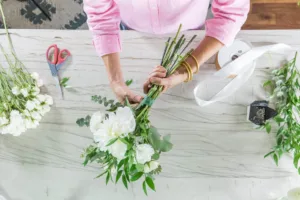
1. Hold one focal flower in your non-dominant hand. 2. Add another flower at a slight angle in your dominant hand. 3. Continue adding flowers in a spiral pattern, incorporating different textures, colors, and sizes. 4. Turn the bouquet as you add flowers to ensure a balanced and rounded shape.
To assemble the bouquet:
1. Place 3 or 4 primary flowers with the most enormous blossoms together for the center. 2. Add more primary flowers one at a time, rotating your hand to create a spiral shape. 3. Repeat the process with secondary flowers to fill any gaps. 4. Adjust the flowers as you add more for a balanced and rounded shape. 5. Trim the stems to your desired final length.
5. Secure the stems:
After you’ve finalized the arrangement, you should use floral tape to bind the stems together securely at the base of the bouquet. Be sure to wrap the tape firmly without applying too much pressure that might damage the stems.
6.Final touch- Wrap your bouquet
To wrap your bouquet, first, secure it with floral tape by wrapping it around the stems about 1-1½ inches below the blossoms, ensuring the stems are tightly held. Then, use approximately 180 inches of ribbon in a matching color palette. Starting from the same point as the floral tape, wrap the ribbon down the stems, covering the tape in a spiral shape for 3-4 inches, and then back up again. Conclude the process by securely fastening the ribbon with a knot or bow, or by enhancing it with pearl-headed pins to add an extra touch of sophistication.
7. Store the Flowers Overnight
After securely arranging the flowers and tying them together, storing the bouquet properly is crucial for the freshest look on your wedding day. Take the time to make the bouquet handle look attractive on the morning of the wedding. Proper storage is essential – keep the bouquet in a cool place, such as a shed or garage, and away from drafts. Prevent wilting by avoiding direct sunlight.
Key Takeaways: Wedding bouquet assembly tips
• Avoid making your bouquet too large, as it will be tiring to hold. A good—and commonly used—size for a bouquet’s diameter is around 8-13 inches, no wider than the bride’s waist.
• Always ensure you acquire more flowers than you anticipate needing, mainly if it’s your first time. Making mistakes or changing your mind along the way is natural, so it’s best to be prepared for such instances.
• Don’t forget to place a mirror in front of you while working. This will allow you to see the front of the bouquet as others will see it.
• When planning to create the bouquet a few days prior, it’s important to do it early enough, ideally 1-2 days before the special day. Freshness is key for any bouquet; you must be very careful if it is a wedding. So buy the flowers 1-2 days before the special day; not all flowers have a long lifespan. Once you’ve completed the process, place the bouquet in a water-filled container and store it in a cool place or the fridge (ensuring any fruits are removed first).
Congratulations on making your own wedding bouquet! Now, you can proudly walk down the aisle and impress your guests with the beautiful bouquet you made yourself. Just wait and see their faces light up when they find out it’s a DIY creation!
Follow Our Social Media page for regular updates on flower arrangements and offers
Get 15% off using “NEW15” coupon code on first purchase flowers and gifts atBlack Tulip Flowers, Qatar